
How To Use Photoshop Action Mockup – Complete Guide
** Do check our Quick Guide before continue reading.
Video Tutorial
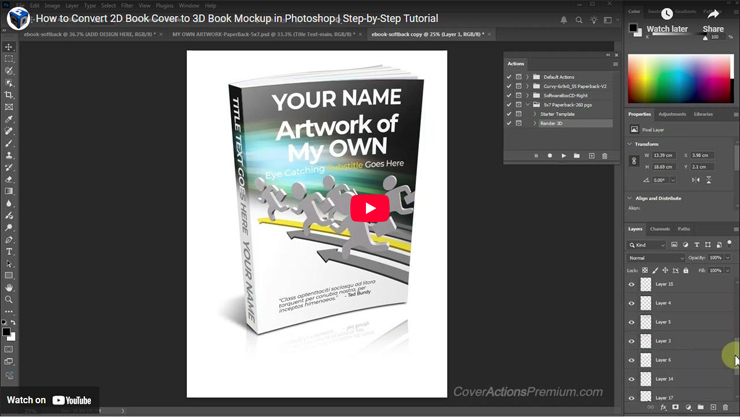
How to Convert 2D Book Cover Artwork to 3D Book Mockup in Photoshop | Step-by-step Tutorial
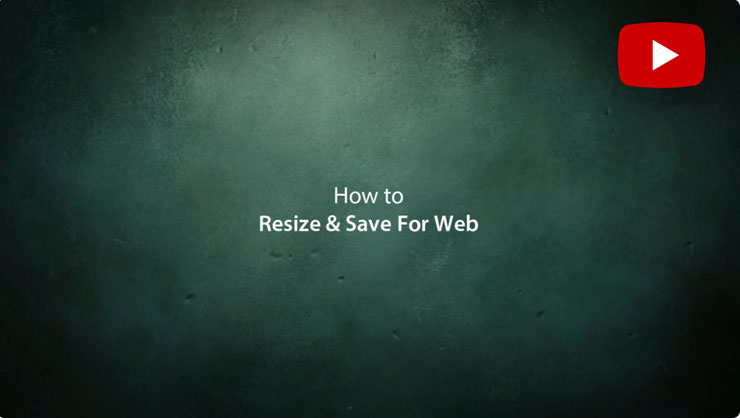
How to Resize High Resolution Mockups in Photoshop -Save for Web Tutorial
Purpose : This manual will show you how to use Photoshop Action and how to use the provided pre-designed PSD template to be used with the Action (ATN).
Prerequisite:
- ENGLISH version of Adobe Photoshop CS2, CS3 ( Standard or Extended ), CS4 ( Standard or Extended ), CS5 ( Standard or Extended ),CS6 ( Standard or Extended ), CC up to Photoshop 2025 pre-installed on your Microsoft Windows OR Apple Mac OS. Photoshop free 7-day trial available at: www.adobe.com/downloads/
- ZIP/UNZIP software such as WinRAR, WINZIP or 7-ZIP. If you don’t have any, heads up to http://www.7-zip.org ( open source software- it’s FREE ).
How To Use Photoshop Cover Action
Assuming that you’ve already downloaded your desired Action (ATN file) and the template (PSD file) onto your desktop computer , the next step is to decompress/ extract the zipped files by double clicking on it.
Fire up Photoshop.
Installing The Action
You need to install the Action (ATN) that you’ve downloaded onto your Photoshop Action palette before you can use it.
Make sure your Actions palette is visible inside your Photoshop window. To do this, on your Photoshop menu tab, go to Window > Actions.
There are 2 common methods to load Action onto your Photoshop:-
Method 1–
The fastest and simplest way to do this is by click, drag & drop the ATN file onto your Photoshop window. Successful loading Action appears in your Photoshop Actions palette.
Method 2–
Less popular and slow way to load your Action is, to go to your Actions palette and click on the small arrow drop down button at the top right.
Click on the Load Action from the drop-down menu and browse to locate your ATN file.
|
|

Find where you have located your ATN file and click the Load button.
Successful loading will show the Action appears in your Actions palette.
Rendering The Action
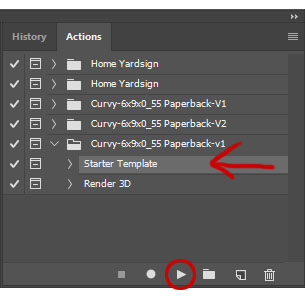
Step 1 – Starter Template
Highlight the Starter Template Action step. Then hit the small Playback button shown as below image.
Step 2 – Add Your Design
After complete running the Starter Template, you may load your own 2D artwork into the provided layer (in your layer palette). Position and scale you 2D artwork to fit the frame.
Step 3 – Render 3D
After complete adding your 2D artwork, highlight on the next Action step which is Render 3D step, and again hit the playback button shown as pic below:
|
|

Using The Pre-Made PSD Templates
Perfect fit ready-made PSD templates provided altogether with the Action could save hours of your working time and effort in designing a cover.
Load the PSD template file onto your Photoshop,
Swap the photo stock image, edit the text to your own, title, subtitle, description,
Select “Render 3D” step and hit play button as shown as below:
|
|
Resizing Your Covers For Web Display Purpose
The regular way of resizing (scale down) your end image rendered by the Action causing “jagged edge” effect & blurry image which is not an eye pleasing view for presentation.
Follow my step-by-step below to eliminate the jagged edge effect out of your works:
Step 1- Merge Your Image Layers
A)Into White Background:
After complete running ‘Render 3D’ step , you’ll need to merge all of the layers generated inside your layers palette into a single layer.
- Use Flatten Image Command in case you want to your image in JPG format ( non-transparent /white background ):
- Go to Layer > Flatten Image
OR
B) Into Transparent Background:
After complete rendering the “Render 3D” action step, go to the “Background Layer” and turn it off (by un-checking the layer’s eye mark).
Then go to Layer > Merge Visible
OR click (highlight) on any active layer, right click your mouse, select “Merge Visible” under drop-down menu.
Step 2- Crop
You may want to discard any unwanted space around your image.
Use your Crop Tool (C) from your Tools palette.
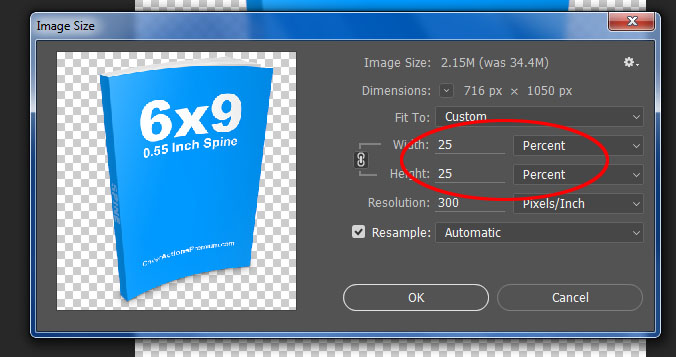
Step 3- Resize
Go to Image > Image Size and resize your image in scale of 25% or 50% smaller from the actual rendered size. See below setting:
|
|
Then click OK.
You may want to repeat the resizing process to your desired size by changing the value between percent or pixels before saving your work.
To save your image(s) to be used on websites, go to File > Save for Web & Devices and choose your format whether JPG, PNG or GIF.
For Photoshop CC or newer version user, go to File > Export > Save For Web (Legacy)